If you've noticed tiny webs, speckled leaves, or fading plant health indoors, there’s a good chance you're dealing with one of the most dreaded pests in plantcare: spider mites. These nearly microscopic invaders thrive in warm, dry environments and can quietly wreak havoc on your plants if left unchecked.
The good news? With the right approach, you can manage spider mites and restore your plants to good health.
What Are Spider Mites?
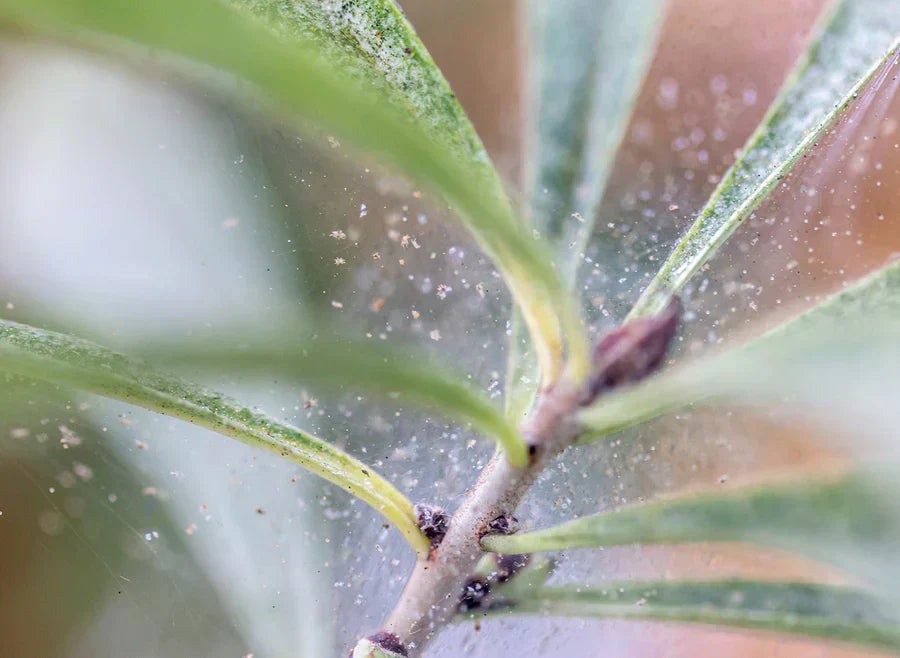
Spider mites are sap-sucking arachnids that tend to hide on the undersides of leaves. As they feed, they cause small yellow or white spots to appear, eventually leading to leaf drop and plant stress. If you see fine silk webbing between leaves or along stems, you likely have an infestation.
Step 1: Identify the Problem Early
Spider mites often go unnoticed until their populations explode. Look for:
• Speckled, yellowing, or bronzing leaves
• Fine, silken webbing between leaves and stems
• A dusty appearance when leaves are held up to the light
Spider mites thrive in dry conditions and are especially attracted to dusty or dirty leaves, where their webs and eggs can go undisturbed. Plants that aren’t cleaned regularly are often the first to suffer outbreaks. Keeping foliage clean not only helps you spot problems sooner, it also makes your plants less inviting to pests in the first place.
Step 2: Isolate the Infected Plant
Before treating, move the affected plant away from your healthy collection to prevent the mites from spreading. Even brushing against leaves can transfer them, so wash your hands and tools after handling.
Step 3: Apply a Treatment
Once isolated, the next step is to treat the plant. Effective options include:
• Insecticidal soap or neem oil – Neem oil is a natural miticide and works by smothering pests. A safe DIY mixture is:
- 1 teaspoon of cold-pressed neem oil
- ½ teaspoon of mild liquid soap (like castile soap)
- 1 quart (4 cups) of lukewarm water
Mix thoroughly in a spray bottle and shake well before each use. Spray all surfaces of the plant—especially the undersides of leaves—until fully coated. Reapply every 5–7 days as needed.
• Rubbing alcohol solution (70%) – Lightly mist or dab with caution; this can quickly kill mites on contact but may stress delicate leaves.
• Commercial miticides – For severe infestations, stronger solutions may be necessary.
Step 4: Rinse and Clean the Leaves
After applying treatment and allowing it to work, rinse and wipe the plant to remove dead mites, eggs, and residue.
• Always clean both the top and bottom of leaves, since mites often hide underneath.
• Common approaches include gloves, rags, or disposable wipes—but these are usually a two-handed process (one hand to hold the leaf, one to wipe). With multiple plants, this becomes time-consuming, wasteful and can often result in pest transmission or leaf damage.
• A more efficient option is the Leaf Sweep™, a tong-and-wand system with washable microfiber covers that is designed for use with treatment solutions. The tool gently clean both sides of a leaf in one motion, using just one hand.
• This step not only clears away pests and webbing but also improves the leaf’s ability to photosynthesize and ensures treatments make better contact.
Step 5: Repeat and Monitor
Spider mites can be persistent. Continue treatments 1–2 times per week for 3–4 weeks, monitoring the plant closely. Consistency is key.
Bonus Tips for Preventing Spider Mites
• Pretreat new plants with a natural insecticidal and the Leaf Sweep. Removing residue and potential pests will set your new plant up for success.
• Boost humidity: Mites hate moisture. Try a humidifier or a pebble tray under your plant.
• Clean leaves regularly: Dust-free leaves are healthier and less prone to pests. A reusable tool like Leaf Sweep makes this easier to keep up with.
• Quarantine new plants: Always isolate and inspect new arrivals before adding them to your indoor jungle.
Final Thoughts
Spider mites are sneaky, but with diligence—and the right plantcare habits—you can win the battle. Combining natural treatments with consistent leaf cleaning gives your plants the best chance to recover and thrive.
Healthy plants are happy plants, and keeping them pest-free is simpler than you might think.
Share: